
Living with Vitiligo is an autoimmune condition where the body attacks melanocytes, leading to the loss of skin pigment and the appearance of white patches. For many, these patches aren't just a medical concern-they're a source of social anxiety and self-consciousness. While medical treatments like phototherapy are great, they take time. That's where vitiligo camouflage comes in. It isn't just about "putting on makeup"; it's about using specialized, high-pigment tools to regain a sense of normalcy and confidence immediately.
Whether you're looking for a quick fix for a job interview or a long-term solution for a stable patch on your wrist, the options have evolved far beyond basic drugstore foundations. Today, we have a spectrum ranging from 6-hour dyes to permanent pigments implanted into the dermis. The goal isn't necessarily to "cure" the skin, but to bridge the gap between medical treatment and daily life, which can improve your quality of life scores by up to 35%.
Quick Guide to Camouflage Options
Before picking a product, you need to know what's actually available. Most options fall into two buckets: temporary and permanent. Temporary solutions require a daily routine, while permanent ones are surgical procedures.
| Method | Duration | Best For | Main Drawback |
|---|---|---|---|
| Liquid Dyes (Henna/Indigo) | 4-6 Hours | Quick, short-term events | Washes off easily |
| Medical-Grade Foundations | 6-14 Hours | Daily wear, face, and body | Daily application time |
| Self-Tanners | 4+ Days | Large areas of the body | Risk of uneven streaks |
| Micropigmentation | Months to Years | Stable patches, lips, fingertips | High cost, permanent risk |
Temporary Camouflage: The Daily Routine
If your vitiligo is still active-meaning new patches are appearing or existing ones are growing-temporary camouflage is your best bet. Using medical-grade foundations is the gold standard here. Unlike your average makeup, these products contain up to 25% more pigment, allowing you to cover a white patch without needing ten layers of product.
You'll generally find three types of formulations. Water-based versions are great for dry skin, while oil-free formulas using dimethicone are a lifesaver for those with oily skin. If you're dealing with high-friction areas or sweat, you'll want anhydrous (water-free) formulas. These are waterproof and use waxes and mineral oils to lock the pigment in place, though they can be a bit tougher to remove at the end of the day.
Brands like Dermablend and Dermacolour are frequently cited for their high color-matching accuracy. However, the secret isn't just the product-it's the application. Most people struggle at first because they apply it like a moisturizer. To get a seamless blend, you need to master a a few specific steps:
- Skin Prep: Start with a pH-balanced cleanser. Any oil or residue on the skin will make the camouflage slide off.
- Natural Light Matching: Always match your shade under natural sunlight. Artificial bathroom lights lie to you about the undertones of your skin.
- Layering and Setting: For water-based products, give it 90 seconds to set before adding a second layer. For anhydrous formulas, wait 3-5 minutes. If you rush, you'll get streaks.
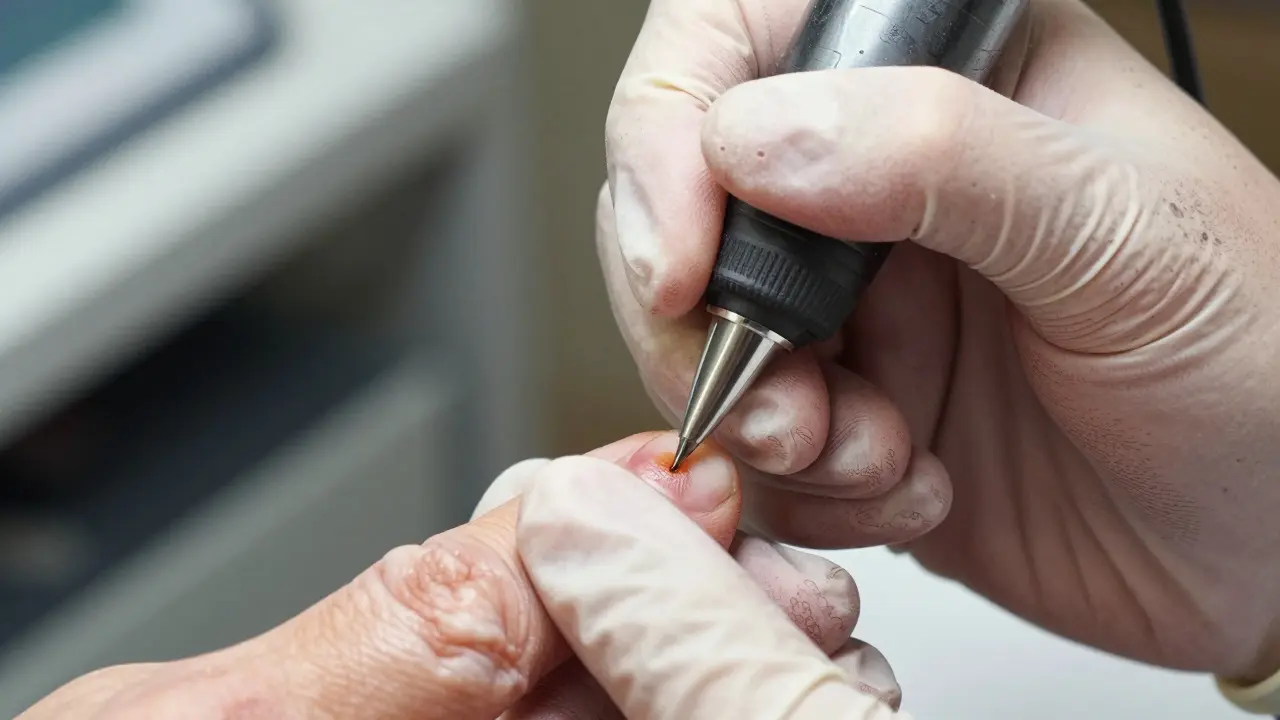
Permanent Solutions: Medical Micropigmentation
For those with "recalcitrant" vitiligo-areas that simply won't respond to medical creams or light therapy-permanent camouflage is an option. This involves micropigmentation, which is essentially a medical tattoo. Instead of ink, practitioners use inert iron oxides in various hues.
This isn't a decision to make on a whim. The most critical rule is stability. Your vitiligo patches must be stable (no growth or change) for at least 12 months before you even consider this. If the condition is still active, you risk a "halo effect," where the skin around the tattoo depigments, making the tattooed area look like a dark island in a sea of white.
The process is intense. A practitioner implants pigment into the superficial and middle dermis, typically hitting a density of 15-20 punctures per square centimeter. You'll usually need 2-3 sessions, spaced 6-8 weeks apart. It works wonders for small, high-visibility areas like the lips, eyelids, or fingertips, but it's less effective on knuckles or elbows where the skin moves constantly, causing the pigment to fade up to 40% faster.
Dealing with the Learning Curve
Let's be real: the first time you try to camouflage a patch, it'll probably look like a smudge of paint. That's normal. Most users report initial frustration with color matching, but this usually clears up after a few weeks of practice. The learning curve for self-application typically lasts about 2 to 4 weeks.
One pro tip is to focus on color theory. Don't just look for "beige" or "brown." Look at the undertones. If your skin has a cool, pinkish tint, a warm orange-toned concealer will look fake. Using complementary colors can help neutralize those odd undertones and make the transition between the camouflaged area and your natural skin nearly invisible.
If you're struggling, consider a certified camouflage consultant. Research shows that 89% of people get satisfactory results after a personalized training session. It's much faster than guessing with $40 tubes of product that might not even match.

Psychological Impact and Quality of Life
It's easy to dismiss this as "just vanity," but for someone with vitiligo, the psychological weight is heavy. Many people avoid social gatherings or feel an intense level of anxiety when people stare. This is why camouflage is treated as a complementary therapy rather than just a beauty choice.
Using these techniques can lead to a significant drop in anxiety and a boost in social confidence. When you aren't worrying about whether your patches are visible, you can actually focus on the conversation you're having. Furthermore, many medical-grade camouflages include SPF, which is vital because depigmented skin is far more susceptible to sunburn, which can further complicate the condition.
Is permanent micropigmentation safe for everyone with vitiligo?
No, it's not for everyone. It is strictly contraindicated for people with unstable vitiligo (where patches are still spreading). If the condition is active, you may develop a halo effect where the pigment looks unnatural. Your patches should be stable for at least 12 months before the procedure.
How do I remove waterproof camouflage without irritating my skin?
Waterproof or anhydrous formulas are designed to stay put, so scrubbing with soap often doesn't work and can irritate the skin. Use an oil-based cleanser or a dedicated makeup remover. Gently massage the oil into the skin to break down the waxes and pigments before rinsing with lukewarm water.
Which is better: self-tanner or medical foundation?
It depends on the area. Self-tanners are better for large body areas because they last for several days. However, they can be streaky and uneven on depigmented patches. Medical foundations offer much more precise color matching and a more natural look, but they require daily application.
Can I use camouflage while still undergoing medical treatment?
Yes, and it's actually recommended. Camouflage serves as a cosmetic bridge while medical treatments like corticosteroids or phototherapy work to repigment the skin. Just ensure your products don't interfere with the absorption of topical medications.
How much does permanent camouflage typically cost?
Costs vary by region and treatment area, but generally, you can expect to pay between $300 and $800 per session. Keep in mind that high-friction areas like hands and feet may require more frequent touch-ups than facial treatments.
Next Steps for Your Journey
If you're just starting out, don't buy a dozen different products. Start by identifying if your vitiligo is stable or active. If it's active, pick up a high-pigment, water-based foundation and spend two weeks practicing the "set and layer" technique in natural light.
If you've had stable patches for over a year and are tired of the daily makeup routine, book a consultation with a certified dermopigmentation specialist. Ask specifically about their experience with the "center-out" technique for evolving patches and request to see a portfolio of their work on high-friction areas if that's where your patches are located.